CAD Manager Ultimate Guide
Getting started
CAD Manager is an integration to a Document Management System (DMS). CAD Manager manages CAD file references and integrates into popular CAD software systems such as AutoCAD, MicroStation, and SolidWorks for example.
CAD Manager can integrate directly into a CAD software, manage file references, and manage metadata.
For installation and administration please see the installation guide and admin guide, respectively.
More resources:
Open Domain Support Page: https://support.opendomain.com/
Ticket Portal: https://opendomain.atlassian.net/servicedesk/customer/portals
Key functionality
Reference management
File references imbedded in CAD files can be read and automatically extracted so all the reference files can be automatically imported and managed in the DMS. Additional related files can also be attached as references so all the necessary files need to work can be grouped together. For example, a CAD file assembly can also contain related photos, pdfs, neutral formats, or reports that can be grouped together and stored as references.
Metadata extraction
Metadata stored in CAD files, such as title block information can be automatically extracted and mapped to index fields in the DMS. Index fields are two-way binding so you can update metadata from the DMS or the CAD software.
Unlimited Nesting Levels
References may themselves contain references. CAD Manager supports arbitrary nesting levels.
Profiles
CAD files can be grouped into customized profiles to define how files should be grouped together.
Minimize Redundancy
CAD Manager detects if an identical version of a file is in the archive and avoids duplicate storage. This saves disk space. The “duplicate check” avoids redundant archiving of already stored documents. When a new assembly is archived, parts that are already in the DMS are not checked in again but linked to the new assembly.
Attributes from File Properties
CAD Manager reads the file properties of the operating system in addition to the CAD attributes.
Multi-CAD-capable
CAD Manager supports multiple CAD systems. A standardized interface manages systems such as Inventor or SolidWorks. Training time is reduced considerably.
Preview Window
The CAD Manager user interface includes a thumbnail for most file types.
Full-Text Option for Selected Systems
CAD Manager extracts all texts from a drawing, not only from the title block, regardless of direction or font.
Enhanced Version History
CAD Manager supports any number of drawing attributes which can be added to the DMS version history.
Bill of Materials
CAD Manager provides parts and materials lists that can be exchanged with an enterprise resource planning system (ERP).
Usage Lists
CAD Manager can search for which assemblies use a given part.
Name Generator
CAD Manager uses a customizable number generator for the creation of unique file names or drawing numbers for a new part or assembly. Each new name is checked against the archive for duplicates.
Viewer Support
CAD Manager supports several commercially available CAD viewers, embedded as well as stand-alone.
CAD Manager supports emailing of drawings including all referenced drawings and support files.
Workflow
The DMS Workflow allows multi-level initiation, approval, and product release workflows.
Scripting
CAD Manager provides numerous options for customization via script events. With this ability, even the most complex customer requirements can be implemented.
Manual Indexing
CAD Manager reads all the attributes from the CAD drawings by default. Additionally, CAD Manager allows for manual and programmatic inputs into the DMS index fields.
CAD Manager Menus for Selected CAD Systems
This feature set allows accessing the DMS functions directly from the toolbar or menu bar of the CAD system.
Create Revisions
This function creates a copy of an archive drawing that will be used for further product development. The old drawing will be set to locked or invalid.
User Guide
This chapter provides an overview of the main features and controls of CAD Manager.
Program Start
Start the DMS and login. CAD Manager activates when a CAD function is selected. CAD Manager activation is indicated by an icon in the system tray (right bottom of the screen) and a splash screen.
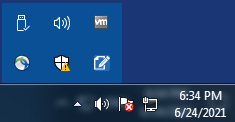
Activate the CAD Manager menu by right clicking the icon.
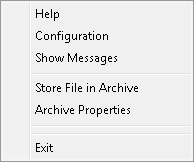
- Help – Displays the CAD Manager User Manual.
- Configuration – Runs the CAD Manager Configuration application.
- Show Messages – Displays the message dialog. The Message Dialog allows the user to send and receive email-like messages with other CAD Manager users.
- Store File in Archive – Performs the archiving function (see below).
- Archive Properties – Displays the properties of the currently-selected archive document (see below).
- Exit – Exits CAD Manager. CAD Manager will automatically run the next time a CAD function is selected.
Functions
CAD Manager Toolbar
| Function | Description |
| Import | Archives a new CAD file, including all references, in the DMS. |
| Copy | Creates a copy of the CAD document, including all references, as a new revision in the archive. |
| Check-out | Checks-out a CAD file, including all references. Opens the CAD program. |
| Check-in | Creates a new version of a CAD document in the archive after it has been edited in a CAD program. |
| Discard | Discards any changes made to a checked-out CAD document. |
| Delete | Deletes the CAD document from the archive. |
| Properties | Displays properties of a CAD document, including all references. |
| View | Displays a CAD file in an external viewer. |
| Export | Creates a copy of the CAD document, including all references, in the file system. |
| Send | Creates a ZIP archive of the CAD document, including all references, and open a new e-mail window in MS Outlook or another e-mail client with the ZIP file attached. |
| Configuration
(Optional) |
Opens the CAD Manager Configuration application and allows for the configuration of the CAD Manager application. |
The CAD Manager Dialog
After selecting a CAD Manager function, the CAD Manager dialog appears (if not switched off by the configuration or by a script event). The dialog displays information about the file and its references.
Below is a brief description of the basic elements of the CAD Manager dialog. A more detailed description of functions, process flows, and options is provided later in this documentation.
Ribbon Bar
HOME Ribbon Tab
| Function Name | Description |
| “Main Function” (Selected action) | Performs the selected function. In the “Properties” dialog, closes the CAD Manager dialog and saves any modified index fields. The icon varies, depending upon the current function. |
| Cancel | Aborts the function and closes the CAD Manager dialog. |
| Choose Folder | Selecting this button will allow the user to choose an archive folder in the DMS to save all the references in the tree. This button will appear for Archiving and Check-out. |
| Archive Lock | Selecting this button will lock all references in the tree. This button will appear for Properties and Check-out. |
| Edit | Selecting this button will check-out the currently-selected file, if it is not already checked out, and will open it with the editing program associated with this format in the CAD Manager Configuration program. If no program is configured, the program defined by the operating system for this file type will be used. |
| Activate | Copies the file or assembly to a temporary directory and opens it with the editing program associated with this format in the CAD Manager Configuration program. If no program is configured, the program defined by the operating system for this file type will be used. |
| View | Copies the file or assembly to a temporary directory and opens it with the viewer program associated with this format in the CAD Manager Configuration program. If no default program is configured, the program defined by the operating system for this file type will be used. |
| Send | Packs the file or assembly into a ZIP archive and starts the default e-mail program, allowing the user to complete the e-mail and send it.
Mail delivery may be adapted to mail programs such as MS Outlook through a specific script. The MS Outlook script is already included in the standard setup. The e-mail script is entered in the CAD Manager Configuration utility in the System section. |
| Messages | Opens the message window. CAD Manager allows users to send email-like messages to other users of the software. This button will flash when new messages have arrived. |
| Configuration | (Optional) Opens the CAD Manager Configuration program. For more details, please refer to the CAD Manager Administrator Manual. |
CUSTOM Ribbon Tab
| Function Name | Description |
| Run Script | Opens a file dialog and allows the user to choose any script file to execute. |
| User Script | The “User Scripts” ribbon tab group will contain buttons for each user-defined script file found in the current Server Package. Clicking a user script button will execute the script. |
HELP Ribbon Tab
| Function Name | Description |
| About | Displays the “About” box for CAD Manager. |
| Help | Displays the CAD Manager User Manual PDF file. |
Tabs
| Function Name | Description |
| Properties | A detailed description of all tabs follows in section “Check-in.” |
| Index Fields | Index fields displays CAD Manager index fields and allows users to edit those fields. CAD Manager index fields are mapped to specific DMS index fields. |
| Version History | Displays a summary of different versions of the selected file within the DMS archive. |
| Attributes | Displays attributes found in the selected CAD document. |
| Text Strings | Displays text strings found in the selected CAD document. |
| Mail History | Displays a summary of different occasions that this file has been sent via email. |
| Where used | Displays a list of CAD documents that reference the selected CAD document. |
| View | Displays a graphical view of the selected CAD document. |
Import
1. In the CAD Manager button menu, select Import from the CAD Document group.
2. From the “Select File to Archive” dialog that appears, select a CAD file to archive. For convenience, files can be filtered based on the type of CAD file to archive. CAD Manager analyzes the file and displays the results in the CAD Manager window (see next section, below, for details).
3. Click the Archive button. The selected file, and its references, will be stored in the configured folder in the DMS.
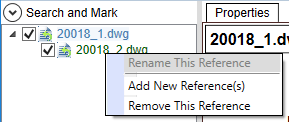
Adding/Removing References
When archiving a CAD file, there may be times when you wish to add additional references, other than what CAD Manager finds for the file. To add a reference, right-click on the top reference being archived. A context menu will be displayed:
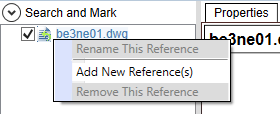
Select “Add New Reference(s).” An open file dialog will be displayed, allowing you to choose a file to include as an additional reference. This file will be examined and will be added to the tree, including any additional references found for that file. Added files are displayed in green.
To remove an added reference, right-click the added reference in the tree and choose “Remove This Reference”.
CAD Manager Window
Most functions will display the CAD Manager window. The functionality of the window depends upon the function being used. However, most tabs display the same information.
The various tabs have been described above. Below are more detailed descriptions of the tabs and any functionality they might have for archiving. If a tab performs differently for another function, the changes will be gone over under the description of that function, below.
Properties Tab
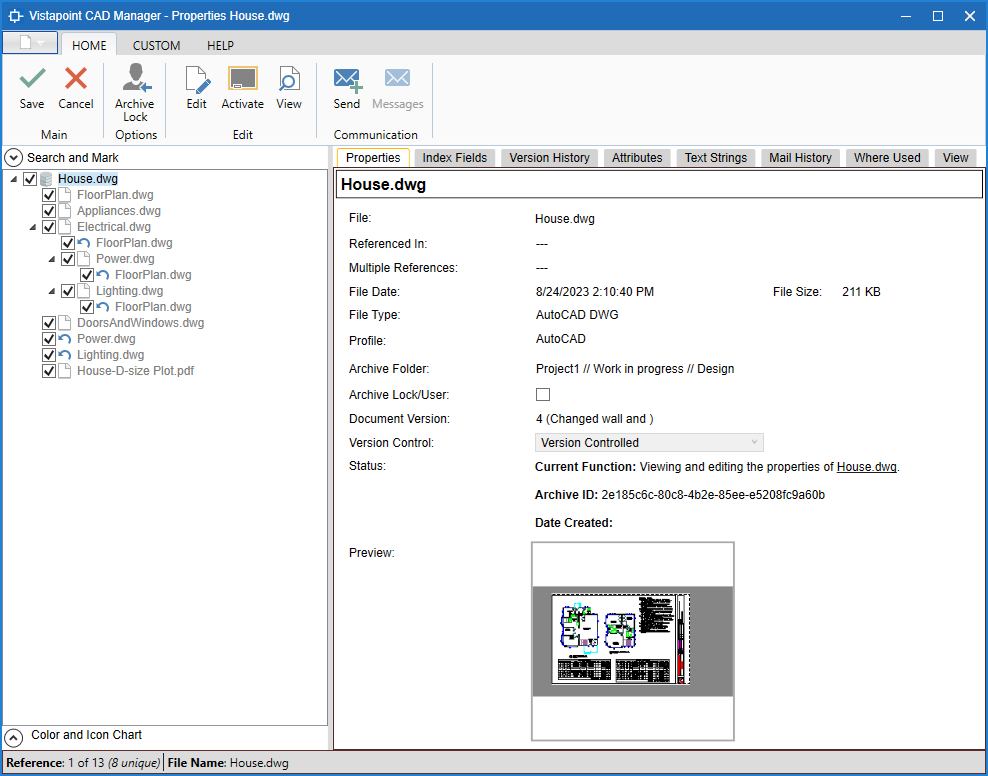
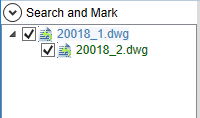
CAD Manager shows all references required by the master file in the file tree. The components of subordinate assemblies are also listed as well as their components (references of references).
If a file was not found, it is displayed in gray. CAD Manager offers several methods to locate a missing file. First, CAD Manager examines the original CAD path, the directory of the main file and other directories that are configured in the profile for each file type. Additional paths can be selected in the right pane of the CAD Manager dialog in the “File” box. CAD Manager will search for other missing files in this path as well.
The “Properties” tab to the right in the CAD Manager dialog displays the following fields for the selected file:
| Descriptor Name | Description |
| Description | Name of the file in the operating system. |
| File | Source path of the file in the operating system. |
| Referenced in | Parent file in the CAD tree. |
| Multiple References | Filename and, in parentheses, the number of times this component is used in the tree. For example, “bflyhse.dwg (1)”. |
| File Date | Date and time of the last modification made to the file. |
| File Size | File size. |
| File type | Description of the CAD file type. For example, “AutoCAD DWG” for an AutoCAD drawing file. |
| Profile | Profile that has been applied to this CAD file. Profiles are automatically assigned according to profiles defined by the CAD Manager Configuration program. If necessary, change the profile by selecting the desired profile from the list and assign it with the small button to the left. |
| Archive folder | The document folder within the DMS into which the file will be saved. To change this folder, click the folder icon to the right. A DMS folder selection dialog will be displayed. Select the destination folder and click OK. |
| Archive Lock/User | A reference can be locked in the archive to prevent it from being accidentally changed by another user. The locking user and the date of the lock are shown under “Status”. |
| Version Control | In the “Version Controlled” selection list, the options “No Version Control”, “Version control” and “No Revisions” can be selected. The default is “Version Controlled”. |
| Status | Information about the current operation is displayed. Examples may include the archive ID of the document, the check-out status, or the lock status. |
| Preview | Thumbnail image of the active document. Clicking the thumbnail will bring up the View tab. |
Index Fields Tab
Index data can be viewed and edited using the “Index Fields” tab. Each index field represents a DMS index field. Changes to the value of a displayed index field will be saved to the corresponding attribute for this file in the DMS archive.
Version History Tab
Once the file has been stored in the archive, the “Version History” tab displays the version history of the archive document. When archiving, only “Most Recent” will be displayed, which represents the current document.
The version number and description are displayed at the top. The information shown for version history can be configured in CAD Manager Configuration.
Attributes Tab
The selected file’s attributes, which were retrieved during the import or check-in process, are displayed when the “Attributes” tab is selected. These attributes can be assigned to DMS index fields automatically, as defined in the CAD Manager Configuration program.
Right-clicking an attribute will bring up the attribute context menu.
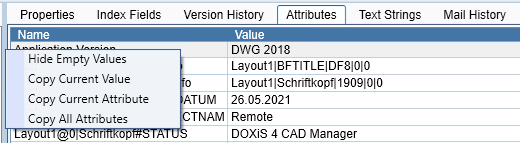
Select “Hide Empty Values” to hide any attribute that does not have a corresponding value. “Copy Current Value” will copy the value portion of the selected attribute to the clipboard. “Copy Current Attribute” will copy the entire selected attribute to the clipboard. Finally, “Copy All Attributes” will copy the entire attribute list to the clipboard.
Text Strings Tab
The “Text Strings” tab displays all text data which has been read from the drawing, independent from text font and text direction. This function is only available with CAD file formats that support text fields, such as AutoCAD drawings. 3D drawings typically do not contain text elements.
Text information will be stored in a full-text field in the DMS and thus becomes available for full-text search.
Right-clicking an attribute will bring up the text string context menu.
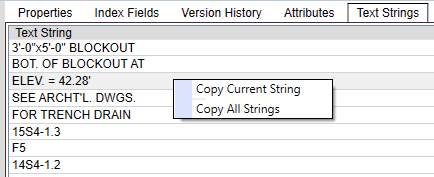
Select “Copy Current String” to copy the selected text string to the clipboard. Select “Copy All Strings” to copy the entire list of text strings to the clipboard.
Mail History Tab
The “Mail History” tab shows a brief history of any time this file has been sent as an email using the “Send” function. Information includes the date sent and any files that were included in the ZIP archive.
Where Used Tab
The “Where Used” tab shows a list of assemblies and modules in the DMS that reference the selected component, including itself. If other files are listed, the selected file is dependent of that file. The information shown in the Where Used tab can be configured in CAD Manager Configuration.
View Tab
In the “View” tab, the selected file can be displayed in an embedded viewer. This requires installation of an optional Viewer, which is configured in the CAD Manager Configuration program. CAD Manager supports several free, as well as commercial, viewers.
Check-out
1. Select a file in the DMS, and then click the Check-out button in the CAD Manager toolbar. The CAD Manager dialog will open.
2. Optionally, enter a location other than the default check-out path. To change the location of an individual file, click folder icon next to the Check-out Folder location textbox in the properties tab. To select the location for all files being checked out, click the Check-out Folder button.
3. During check-out, the DMS system checks out the master file, while references are only copied out as read-only so that they remain available for editing to other users. In addition, an archive-lock can be set for each reference, to prevent other users from changing these files inadvertently while they are being edited by another user.
To set an archive lock, check the checkbox next to “Archive Lock/User” in the properties tab. The lock status is always displayed in the CAD Manager dialog. It shows who locked the file and the date it was locked. The archive-lock can be set for all references using the “Archive lock” button in the ribbon bar.
4. Click the Check-out button in the CAD Manager window to copy the files into the working directory that is specified in “Check-out Path”. If a script event was configured to be performed after check-out, it is executed now. Otherwise, the editing program set in the configuration opens with the checked-out file.
Check-in
1. To check-in a modified file to the archive, select the file in the DMS and click the Check-in button from the CAD Manager toolbar.
For most CAD programs, add-ins are available that provide access to CAD Manager functions from a toolbar or menu bar, allowing you to start the check-in process right from the CAD program.
2. Make any adjustments to references and click Check-in.
3. A dialog box opens that allows you to enter the version number, as well as an optional version comment. Depending upon the configuration settings, the version number may or may not be editable. If it is not editable, then it will be managed by the DMS.
Checking “Publish” will set the version to the next major version (for example, “1.0” will become “2.0”). If not checked, the version will be set to the next minor version (for example, “1.0” will become “1.1”).
To apply these values to all changed references, click the “OK for All” button. Otherwise, click OK to continue.
4. The “Delete Work Files” dialog box asks whether the files from the working directory should be deleted. Select Yes to remove files from your local folder. CAD Manager can be configured in CAD Manager Configuration to delete or keep files automatically without prompt.
5. Click the Properties button in the “CAD Document” group and then click the Versions tab to display the version history. The historical attributes of previous versions are displayed. The desired attribute names are predefined in the CAD Manager Configuration program (see the CAD Manager Administrator Manual for more information).
Additional Features
When checking a file in, you may, once again, elect to add references to your tree. The instructions on how to do this can be found in the Archiving section, above.
Discard – Discard deletes the checked out local version and unlocks the file in the DMS.
Properties
1. Select a file in the DMS and click the Properties button in the CAD Manager toolbar. The CAD Manager dialog will then open.
2. Manage references and lock and references you wish to lock.
3. When finished, click Save to save changes, or Cancel to exit without saving.
Additional Features
The “Version History” tab for the Properties function allows you to view different versions of the selected file. Each displayed version has an icon next to it indicating the status.
![]() Check mark icon – This is the currently selected version. When the CAD Manager window is first displayed, the most recent version is always selected.
Check mark icon – This is the currently selected version. When the CAD Manager window is first displayed, the most recent version is always selected.
![]() Go Back icon – This is a previous version. Click the icon to display information for that version.
Go Back icon – This is a previous version. Click the icon to display information for that version.
When a version other than the most recent has been selected, all properties, index fields, attributes, text strings, mail history, “where used”, and the viewed file will be displayed for that version of the file, rather than the current version. Additionally, the “Properties” tab will show an icon indicating that this is not the current version of the file.

Archive Copy
The “Archive Copy” function creates a copy of an existing archived drawing in the archive. There are several script events that can be used to customize the archive copy process, such as modifying attributes for the new file.
1. Select a file in the DMS and click the Copy button in the CAD Manager toolbar. The CAD Manager window will open.
2. Specify a new name for each file by clicking the checkbox in front of each file name in the reference tree. You will be prompted to increase the revision of the file. Clicking “Yes” will modify the name of the file based on the current revision of the name. Clicking “No” will keep the file name the same and allow it to be changed in the next dialog. Clicking “Cancel” will cancel the name change and uncheck the checkbox in front of the file.
3. The rename dialog will be presented, allowing you to modify the name. If the revision was increased in the previous step, a new name will be displayed with the new revision identifier. When the name has been entered, click OK.
4. Repeat these steps for each file that should be copied to the archive by clicking the check box next to the reference.
5. Once all desired files have been checked and renamed, click the Copy button in the CAD Manager window to start the copy process. For selected formats, such as AutoCAD and Inventor, CAD Manager will automatically update the changed reference names in the drawing file. For others, check out the file and re-link any references in the main file.
View
1. Select a file in the DMS and click View button in the CAD Manager toolbar.
2. The external viewer program that is pre-configured for the selected file type will be activated and the selected file displayed and opened.
Export File or Assembly
1. To export/download a file or assembly to your local system, select the file in the DMS and click Export from the CAD Manager toolbar.
2. Check the checkbox next to the files that you wish to copy.
3. If the listed “Copy Folder” path is not the desired location, click the folder icon to the right and choose another folder. Alternatively, click the Copy Folder button in the ribbon bar to choose a single copy location for all checked references.
4. Click the Export button. CAD Manager will save a copy of the selected files to the chosen copy folder.
Add-ins for CAD systems
CAD Manager provides add-ins for selected CAD systems. This gives the user the full functionality of CAD Manager in a familiar work environment. The CAD Manager functions are provided via a toolbar or a separate menu. The add-ins support at a minimum the basic functions described below.
Activate the DMS
Opens the DMS.
Import
Saves and closes the current drawing, which is then stored in the DMS as a new file.
Check-out
Opens the DMS. Using the selection dialog, the user may then search and select a file from the result list to check out and open for editing in the CAD system.
Check-in
A previously checked-out archive file is checked back into the archive.
Prepare Component
Opens the DMS. Using the selection dialog, the user may then search and select a file from the result list which is then added as a component to the current drawing in the CAD program.
Glossary
| Name | Description |
| Attribute | CAD Manager reads information stored in CAD drawings (such as the title block, scale, approval status, parts list, etc.) and optionally maps these attributes to the DMS index data. |
| Check-in | When edits to a checked-out file have been completed, the user starts the check-in process that analyzes updates to the file and creates a new version in the archive. Only files that have been updated will be saved in the archive. |
| Check-out | Before changes can be made to an archive, it has to be checked out. The file is copied to the local file system and opened in the assigned editing program. |
| Document ID | Unique file number in the CAD Manager archive. This is generated automatically by CAD Manager. Replication or export to another DMS archive does not change this number. |
| External Reference | A separate image or CAD file which is linked to one or more master files. |
| Index Dialog | The DMS uses index dialogs for viewing and editing metadata that is used to “index”, or classify, a document. |
| Index Field | The DMS uses index fields for storing metadata of a document. It is used for classifying and searching documents. |
| Master File | Indicates a CAD file that was selected for processing with a CAD function. This can be a drawing, a module or a simple component. The main file may contain external references. The main file is displayed at the top of the reference tree in the CAD Manager dialog. |
| Profile | CAD Manager uses profiles to assign parameters and script events for selected CAD file types. |
| Search Dialog | The DMS provides search dialogs which can be used to select documents according to user-specified search criteria. |
| Text Strings | Certain CAD formats such as AutoCAD DWG support text strings. CAD Manager extracts texts and stores them in a DMS full-text field. |
| Title Block | The text part of a CAD file, which contains information about the project, the editor, the processing status, etc. |
| UID | Unique file number in the the DMS archive. The UID is generated automatically by the DMS. Replication or export to other DMS archives might change this number. |