How Can We Help?
-
Getting Started
-
- Articles coming soon
-
-
FAQs
-
Installation
- AutoCAD Add-in installed but tab not showing.
- How to install the AutoCAD Add-in
- How to install the Catia Add-in
- How to install the MicroStation Add-in
- How to install the SolidWorks Add-in
- How to install Vistapoint CAD Manager
- How to install Vistapoint Desktop
- Microstation VBA script not loading on startup
- Vistapoint Quick Start Guide
- You must install or update .NET to run this application
-
CAD Manager
-
Vistapoint
-
- Vistapoint April 2025 Release Notes
- Vistapoint December 2024/January 2025 Release Notes
- Vistapoint December 2025 Release Notes
- Vistapoint February 2026 Release Notes
- Vistapoint June 2025 Release Notes
- Vistapoint March 2025 Release Notes
- Vistapoint May 2025 Release Notes
- Vistapoint November 2024 Release Notes 2024.1.2.1201
- Vistapoint October 2024 Release Notes 2024.1.2.1022
- Vistapoint October 2025 Release Notes
-
- Getting started with the Vistapoint Catia Integration
- Getting started with the Vistapoint SolidWorks Integration
- How to add a numbering rule
- How to add index fields
- How to add index fields to document classes
- How to add users
- How to add users to a Workspace
- How to bulk rename documents
- How to configure duplicate search
- How to configure SolidWorks Toolbox with Vistapoint
- How to create a Bill of Materials (BOM) List
- How to create a workspace class
- How to create CAD neutral files (STEP, PDF, etc.)
- How to edit/check-out documents
- How to install & configure for Inventor
- How to install and configure for PTC Creo
- How to install the Catia Add-in
- How to manage billing
- How to recover recycled documents
- How to rename references without breaking assembly relationships
- How to restore to a previous version
- How to review and release documents workflow
- How to search for documents
- How to select import location
- How to set a revision
- How to use MyWork to manage local file changes
- Package - How to rename and create neutral files in bulk
- Show Remaining Articles (12) Collapse Articles
-
- CAD files have no references or metadata
- Can't start Inventor Apprentice Server: Inventor.ApprenticeServer
- Error after installing new version
- Error Logging in to Vistapoint web app
- Error processing command checking out from web app
- File is in use. Close related file(s) and try again
- File not located in Vistapoint local folder
- How to restore permanently deleted files
- Icon file not found - error initializing the Vistapoint Assistant
- MyWork changes still showing after successful check-in
- Numbering or attribute mapping not working after changes
- Path to RealDWG Not Found
- RestHttpClient.SendRequest failed or Execution Timeout Expired
- SolidWorks Creating PDF Automatically
- SolidWorks references not finding the right files in sub folders
- SolidWorks Thumbnail Not Updating
- The file was not analyzed because a suitable File Manager was not found
- Trouble logging in
- Vistapoint web app stuck on loading
- Vistapoint won't open after install
- You must install or update .NET to run this application
- Show Remaining Articles (6) Collapse Articles
-
Integrations
-
- Getting started with the Vistapoint SolidWorks Integration
- How to configure SolidWorks Toolbox with Vistapoint
- How to install the SolidWorks Add-in
- How to turn off Save As on SolidWorks Assemblies trying to save read-only parts
- SolidWorks references not finding the right files in sub folders
- SolidWorks Thumbnail Not Updating
< All Topics
How to configure SolidWorks Toolbox with Vistapoint
Updated
It is recommended to store the SolidWorks Toolbox on a shared network drive or in a Vistapoint Workspace so that everyone has access the same standard parts. Set up a Toolbox in a Vistapoint workspace with the following steps.
- Create a Toolbox workspace in Vistapoint.
- Navigate to the Vistapoint MyWork tab and update the newly created workspace so you have the local workspace downloaded at C:\VistapointLocal\[Toolbox Workspace]
- Back up or create a copy of the old Toolbox folder.
- Copy the old Toolbox folder contents (ex. C:\SOLIDWORKS Data) to the new Toolbox location (ex. C:\VistapointLocal\[Toolbox Workspace]). For more information see: Migrating to a shared toolbox.
- Delete the folders for any standards not used.
- In SolidWorks navigate to Tools > Options > System Options tab > Hole Wizard/Toolbox and set the new Toolbox path to C:\VistapointLocal\[Toolbox Workspace]\.
- Click Configure… to open the SolidWorks Toolbox application.
- Select Customize your hardware. Deselect all the standards that you do not need. Navigate back to home.
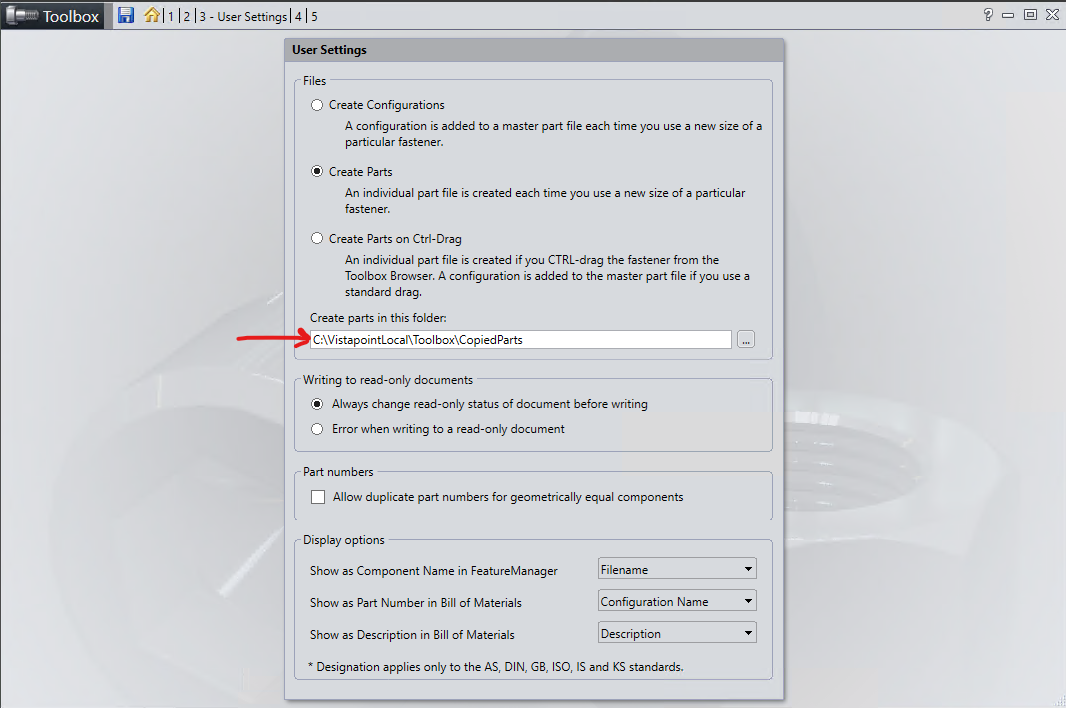
- Select Define user settings.
- For the Create Parts option, select the local workspace path under Create parts in this folder. (ex. C:\VistapointLocal\[Toolbox Workspace]\CopiedParts). Navigate back to home.
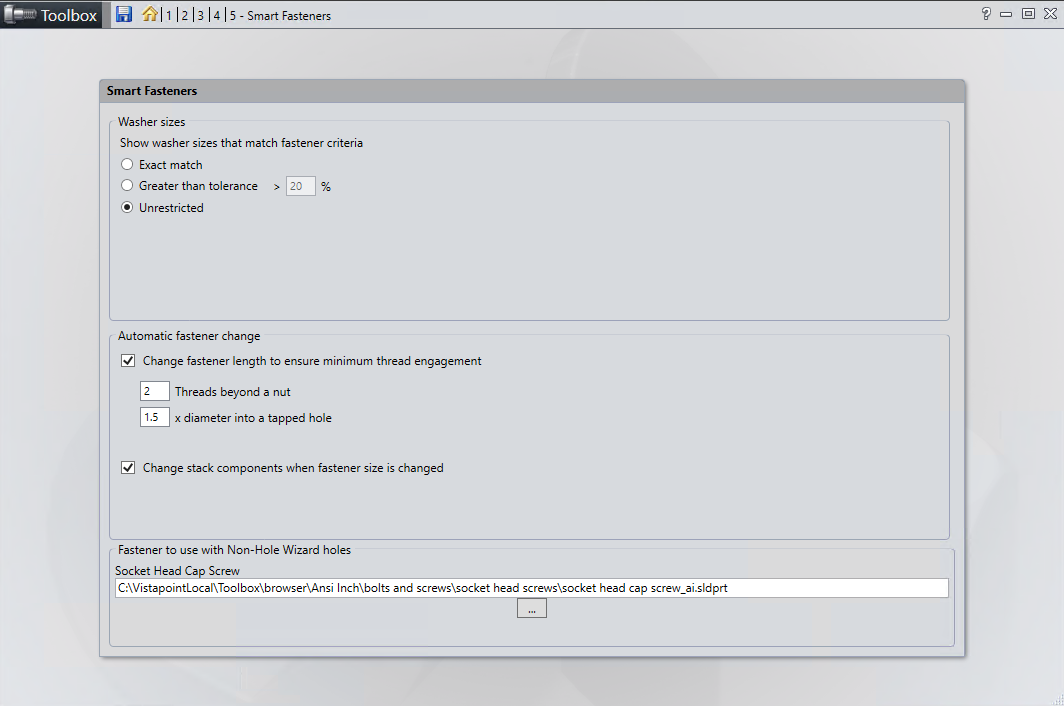
- Select Configure Smart Fasteners.
- Update the path to the Socket Head Cap Screw at the bottom.
- Close the Toolbox application and save changes.
- Check-in the added Toolbox files into Vistapoint. This could take some time if you have many standard parts in your toolbox.
References
https://help.solidworks.com/2021/english/SolidWorks/toolbox/HIDD_TOOLBOX_HOME_PAGE.htm
https://help.solidworks.com/2024/english/SolidWorks/toolbox/t_migrating_shared_toolbox.htm