How to install the MicroStation Add-in
1. Install
1. Double click to run the setup program OCM MicroStation Add-in [version] for [DMS] [language].msi. The setup program copies all required components to the folder C:\Program Files\Open Domain\OCM AddOns\MicroStation.
2. Add MicroStation script
1. Open the Personal.dgnlib file in MicroStation:
C:\Users\[username]\AppData\Local\Bentley\MicroStation\10.0.0\prefs\Personal.dgnlib
Tip: You need to open the Personal.dgnlib file for changes to get added, not any Microstation file.
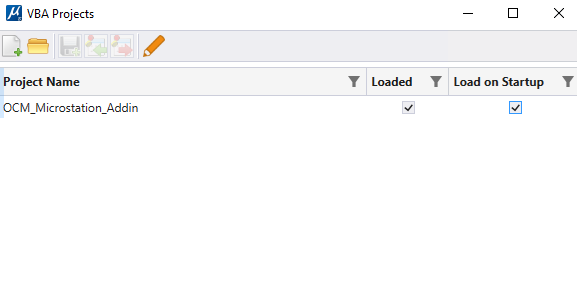
2. Under the Utilities Tab, click VBA Manager.
3. Click Open a VBA Project from Disk.
4. Select the mvba file in the Open Domain MicroStation install folder:
C:\Program Files\Open Domain\OCM AddOns\MicroStation\OcmMicrostation.mvba
5. Select the check box for Load on Startup.
3. Add MicroStation toolbar
Two options exist for adding the Doxis toolbar to MicroStation.
Option A:
The Personal.dgnlib file from MicroStation contains the customization and toolbar information. To copy over the toolbar stored in the Personal.dgnlib file,
- Copy the Personal.dgnlib file:C:\Program Files\Open Domain\OCM AddOns\MicroStation\Personal.dgnlib
- Paste and replace the file to the MicroStation preferences folder: C:\Users\[UserName]\AppData\Local\Bentley\MicroStation\10.0.0\prefs
WARNING: This method will overwrite any previous customization done to MicroStation and carries the risk of unintended changes to other portions of the MicroStation user interface. Therefore this method is not recommended unless no other modifications have been performed to the installation of MicroStation.
Option B:
Manually add icons and create the toolbar and buttons in MicroStation. This method is described below.
1. Close any files open in MicroStation.
2. Open the Personal.dgnlib file in MicroStation:
C:\Users\[username]\AppData\Local\Bentley\MicroStation\10.0.0\prefs\Personal.dgnlib
Tip: You need to open the Personal.dgnlib file for changes to get added, not any MicroStation file.
Add Icons
3. Go to File > Settings > Configuration > Customize.
4. Click the tab Icons.
5. Click the Import Icons button dropdown and select From Bitmaps…
6. Upload the icons located in the install folder with the names in the table below:
Icon folder: C:\Program Files\Open Domain\OCM AddOns\MicroStation\Images
| Icon Name | File Name |
|---|---|
| OCM.Activate | OCM.Activate.bmp |
| OCM.SaveToArchive | OCM.SaveToArchive.bmp |
| OCM.LoadFromArchive | OCM.LoadFromArchive.bmp |
| OCM.CheckIn | OCM.CheckIn.bmp |
| OCM.CopyFromArchive | OCM.CopyFromArchive.bmp |
| OCM.AddPart | OCM.AddPart.bmp |
| OCM.Properties | OCM.Properties.bmp |
Add toolbar
8. In the MicroStation top menu, right click and select Customize Ribbon.
9. Under the Customize the Ribbon section on the right side, click New Workflow. Name the new tab Document Management System.
10. Select the new workflow and click New Tab. Name the new tab DMS.
11. Select the new tab and click New Group. Create three groups called:
- General
- Edit
- Add
12. For each group, select the group and click New Button to create a new button for each group as described in the following table.
| Group | Label | Description | Key-in | Icon Name | Size |
|---|---|---|---|---|---|
| General | Activate | Activate DMS client. | VBA RUN OcmActivate | OCM.Activate | Medium |
| General | Properties | View file properties stored in DMS. | VBA RUN OcmProperties | OCM.Properties | Medium |
| Edit | Import | Import file to DMS. | VBA RUN OcmSaveToArchive | OCM.SaveToArchive | Medium |
| Edit | Check-out | Check-out to edit file from DMS. | VBA RUN OcmLoadFromArchive | OCM.LoadFromArchive | Medium |
| Edit | Check-in | Check-in changes to DMS. | VBA RUN OcmCheckIn | OCM.CheckIn | Medium |
| Add | Prepare Component | Export file from DMS to add as a reference. | VBA RUN OcmPrepareComponent | OCM.CopyFromArchive | Medium |
| Add | Add Component | Add reference to current file. | VBA RUN OcmInsertComponent | OCM.AddPart | Medium |
Tip: If icons are not showing, check for leading spaces before the icon name.
13. Click Apply.

You can then select the dropdown in the top left for Document Management System to access your new buttons.

Company-wide MicroStation Settings:
If you have a company distributed MicroStation Personal.dgnlib settings file, you can add the buttons and toolbar as described in method C, then distribute to clients through method A.
1. Follow the steps in Option B to add the toolbar to your MicroStation Personal.dgnlib file.
2. Distribute to clients through the method described in Option A copying the new Personal.dgnlib file saved in your MicroStation instance.