How Can We Help?
-
Getting Started
-
- Articles coming soon
-
-
FAQs
-
Installation
- AutoCAD Add-in installed but tab not showing.
- How to install the AutoCAD Add-in
- How to install the Catia Add-in
- How to install the MicroStation Add-in
- How to install the SolidWorks Add-in
- How to install Vistapoint CAD Manager
- How to install Vistapoint Desktop
- Microstation VBA script not loading on startup
- Vistapoint Quick Start Guide
- You must install or update .NET to run this application
-
CAD Manager
-
Vistapoint
-
- Vistapoint April 2025 Release Notes
- Vistapoint December 2024/January 2025 Release Notes
- Vistapoint December 2025 Release Notes
- Vistapoint February 2026 Release Notes
- Vistapoint June 2025 Release Notes
- Vistapoint March 2025 Release Notes
- Vistapoint May 2025 Release Notes
- Vistapoint November 2024 Release Notes 2024.1.2.1201
- Vistapoint October 2024 Release Notes 2024.1.2.1022
- Vistapoint October 2025 Release Notes
-
- Getting started with the Vistapoint Catia Integration
- Getting started with the Vistapoint SolidWorks Integration
- How to add a numbering rule
- How to add index fields
- How to add index fields to document classes
- How to add users
- How to add users to a Workspace
- How to bulk rename documents
- How to configure duplicate search
- How to configure SolidWorks Toolbox with Vistapoint
- How to create a Bill of Materials (BOM) List
- How to create a workspace class
- How to create CAD neutral files (STEP, PDF, etc.)
- How to edit/check-out documents
- How to install & configure for Inventor
- How to install and configure for PTC Creo
- How to install the Catia Add-in
- How to manage billing
- How to recover recycled documents
- How to rename references without breaking assembly relationships
- How to restore to a previous version
- How to review and release documents workflow
- How to search for documents
- How to select import location
- How to set a revision
- How to use MyWork to manage local file changes
- Package - How to rename and create neutral files in bulk
- Show Remaining Articles (12) Collapse Articles
-
- CAD files have no references or metadata
- Can't start Inventor Apprentice Server: Inventor.ApprenticeServer
- Error after installing new version
- Error Logging in to Vistapoint web app
- Error processing command checking out from web app
- File is in use. Close related file(s) and try again
- File not located in Vistapoint local folder
- How to restore permanently deleted files
- Icon file not found - error initializing the Vistapoint Assistant
- MyWork changes still showing after successful check-in
- Numbering or attribute mapping not working after changes
- Path to RealDWG Not Found
- RestHttpClient.SendRequest failed or Execution Timeout Expired
- SolidWorks Creating PDF Automatically
- SolidWorks references not finding the right files in sub folders
- SolidWorks Thumbnail Not Updating
- The file was not analyzed because a suitable File Manager was not found
- Trouble logging in
- Vistapoint web app stuck on loading
- Vistapoint won't open after install
- You must install or update .NET to run this application
- Show Remaining Articles (6) Collapse Articles
-
Integrations
-
- Getting started with the Vistapoint SolidWorks Integration
- How to configure SolidWorks Toolbox with Vistapoint
- How to install the SolidWorks Add-in
- How to turn off Save As on SolidWorks Assemblies trying to save read-only parts
- SolidWorks references not finding the right files in sub folders
- SolidWorks Thumbnail Not Updating
< All Topics
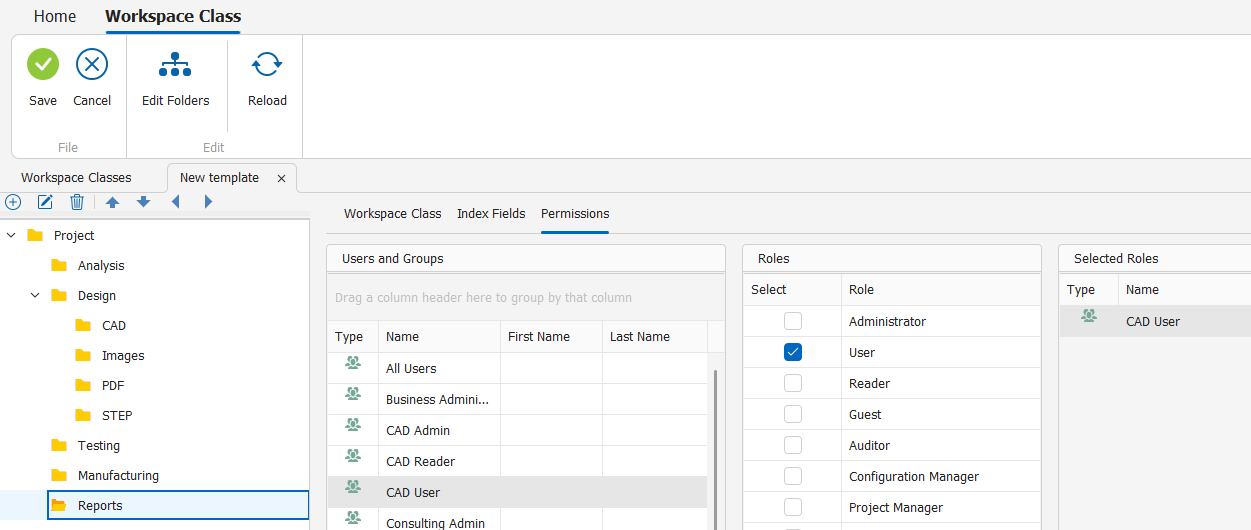
How to create a workspace class
Updated
A workspace class is a template of folders, index fields, and permissions used to standardize and organize your workspaces. Administrator access is required to create a workspace class.
- Open Vistapoint Configuration under Start > Configuration.
- Click on Workspace Classes.
- Click Add.
- Add a name and description.
- To edit the folder structure, click Edit Folders. Edit the default folders in the folder tree. Click the Edit Folders button again to save the folder structure.
- To add index fields, click the Index Fields tab. Select index fields from the right panel. Click Copy. Order the index fields to display in the left panel.
- To edit permissions, click the Permissions tab. Select a user or group from the left panel. Select which permissions to give in the middle Roles panel. Select a different group or user to update the Selected Roles panel. Warning: These are global roles for workspaces of this class. If you don’t want to assign global roles for this class, you can leave these empty and assign permissions later when you create a workspace from this class.
- Click Save.